myCBR 3 tutorial information for ICCBR 2012
Tutorial slides
Read up on myCBR 3 and how to make the most of it in your CBR application. All in one slide set myCBR 3: Tutorial slides
Useful links to 3rd party software (archived)
The following links list useful 3rd party software for your CBR application development.
Tutorial for myCBR v2.6.x
Contents
1. About this tutorial
This tutorial gives a short introduction to myCBR as a plugin for Protégé.
Here you can get information on how to set up the plugin and getting started using myCBR.
See how to import CSV files, model similarity and use the retrieval engine.
Everything explained here uses the Protégé project used_cars_flat.pprj
which can be found in the directory samples/Used Cars (flat)/ of the
downloadable zip-file myCBR-version-bin.zip.
Each directory listed is relative to the myCBR-version-bin.zip's root directory.
 A little
screw-wrench marks short paragraphs, which should help new developers getting started.
These paragraphs give special hints, which might be useful when trying to
adapt or extend the myCBR plugin.
A little
screw-wrench marks short paragraphs, which should help new developers getting started.
These paragraphs give special hints, which might be useful when trying to
adapt or extend the myCBR plugin.
We assume that you are familiar with the basic features of protege, so you know about protege's class and slot browser which are included in myCBR's sme tab.
Since our aim is to give a short introduction to myCBR, there are a lot of things not
described in this tutorial. For example, there are many ways to model string similarities with myCBR.
Moreover, there is a possibility to use external similarity measures.
There is a separate document on external similarities which can be found at:
http://mycbr-project.net/external.html
Feel free to send questions to  .
.
2. Download PDF version
Click the following link to download a PDF-version of this tutorial (version: 1.1).

To view the PDF-file you can download Adobe Reader for free:

3. Getting Started
To run the myCBR plugin for Protégé download Protégé at http://protege.stanford.edu/index.html (basic release should suffice) and install it.
Then copy the myCBR plugin folder de.dfki.mycbr
from protege_plugin/de.dfki.mycbr (and its content of course)
into Protégé's plugins directory, for instance:
/opt/Protege_3.3.1/plugins.
After starting Protégé and opening a project you can enable the
myCBR plugin as follows:
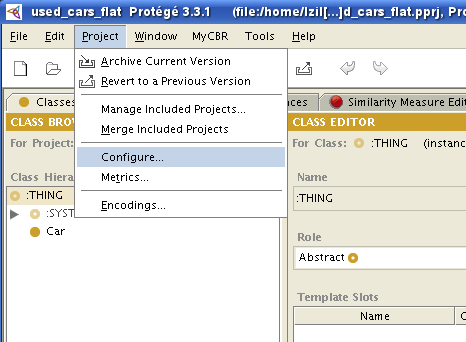
Use the menu item Project -> Configure as shown in the picture below.
There are three myCBR items listed:
MyCbr_Similarities_Tab,
MyCbr_Retrieval_Tab and
MyCbr_Explanation_Tab.
You have to enable the first two tabs in order to use the myCBR functionality.
The MyCbr_Explanation_Tab is optional and will not be discussed here.
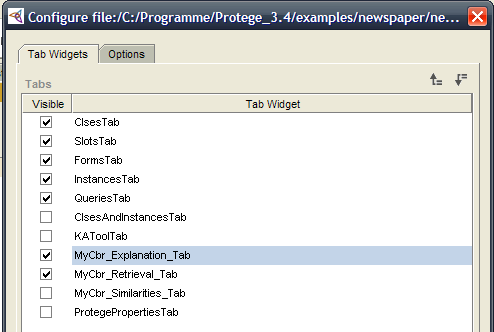
If the tabs are visible similar to the following picture,
you have successfully installed the myCBR plugin.
Some had problems installing the myCBR plugin under linux, due to the fact that
the preinstalled java version has been used. We recommend using a sun java.
Note:
If you are developing for the myCBR project,
you might be interested in using ANT to copy program files into the plugin directories, start
Protégé from eclipse, etc. For this purpose you have to customize the
build.xml file by changing some directory properties.
There is a log file mycbr_0.log which is located in your Protégé folder.
In case problems occur you can either look on the output of the Protégé's console or you can ready the myCBR log.
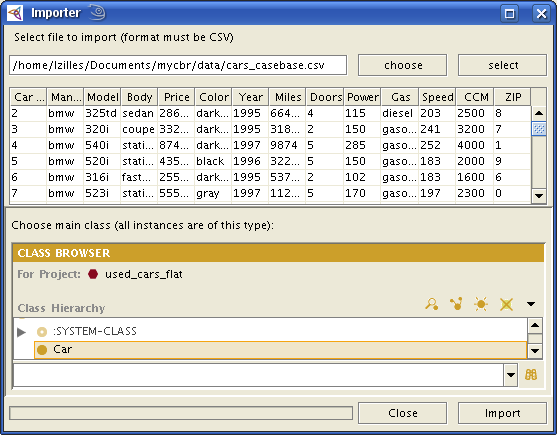
4. Import CSV File
myCBR supports CSV import in order to generate an initial model from existing data ant to create Protégé instances used as case base
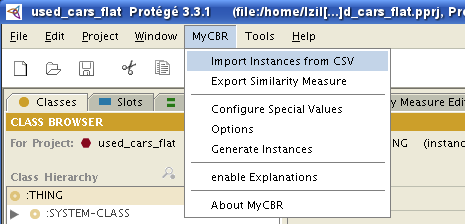
Use MyCBR -> Import instances from CSV in the main menu.
Then choose the CSV file you want to import, e.g. samples/Used Cars (flat)/
cars_casebase.csv. The importer lists
all datarows that are selected for the import. You are not able to edit them in the given table
since this table is read-only.
To be able to import the values, you have
to specify a class in the Class Hierarchy.
The datarows then become instances of this class.
Choose a pattern from which the instances' names are going to be created.
Unique names will be generated if you click don't care or
choose a pattern that is not sufficient.
The first line of the CSV file should specify the names of the slots.
This means that there has to be one slot for each value listed
in the first line of the CSV file. If there are values,
that do not have a corresponding slot, they can be created automatically, otherwise,
the file cannot be imported. Be aware that the slot types, the maximum, minimum, and allowed values
for the created slots are determined and may have to be edited.
If you try to import values that are not allowed for the corresponding slot
(e.g. doesn't assume values in the given range),
those values will be skipped and you get a message Sorry, could not import some rows.
The values which caused that error are
now marked red. You are able to edit these cells either by double clicking on
the cell to edit the value or by using the button "+" (adds the specified
value to the allowed values of the slot).
Of course, you can manually add instances using
Protégé's Instances Tab.
From now one, the imported instances are used as query and case values for our retrieval and we
can start modelling local similarity measures for our slots.
5. Similarity Modelling
Switching to the similarity measure editor, you first see the settings for the global
similarity measure function (SMF) of the current class.
In our example this is the class Car
which is selected in the class browser in the upper left hand side corner.
The similarity measure for this class (our global SMF)
is composed of local SMFs of each slot. For this reason we start
editing the local SMFs for each slot first.
5.1 Local Similarity Measures
There is the slot browser on the left hand side showing each slot currently specified.
Choose one, to edit its local SMF.
You can only specify SMF for the following slot types:
integerfloatsymbolstringboolean
So you cannot specify a similarity measure for instance,
class or any.
In order to be able to edit the SMF you need to enter a minimum and maximum value for float and integer slots, which defines the range for the SMF.
First choose between the following similarity modes (depending on the type of you slot):
There is an initial SMF for each slot. You can simply edit it. If you delete it and no SMF is defined, you will get the info "no similarity measure defined".
There is also a built-in transformer which tries to convert the old similarity function into the new one when changing the similarity mode.
You can easily add new function types if you want to use your own customized similarity measure.
To do so, you must extend the class EditorSMFunction.java,
implement all abstract methods as described
and add it in SMFunctionFactory.java.
Our next step is to edit the SMF of our slot Price which is of type
integer. Here we can use the advanced similarity mode.
5.1.1 Advanced Similarity Mode
The advanced similarity mode can be chosen for the slot types
integer and float.
You should use advanced similarity mode in case your
similarity measure function cannot be represented by the standard similarity mode.
In the given example, the advanced similarity mode is used to
define the local similarity of Price.
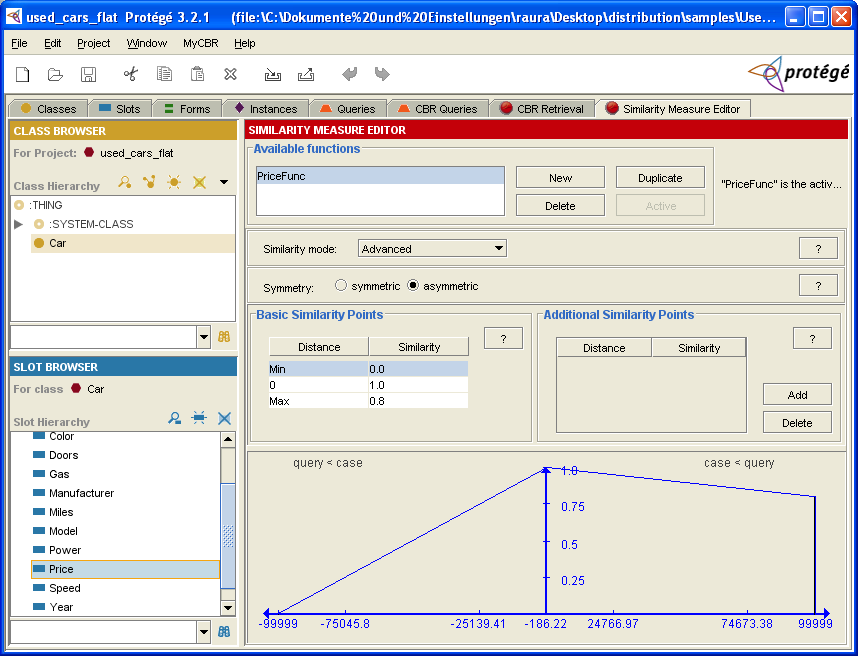
We use asymmetric similarity mode due to the fact that sim(x,y) (where the query value x is
smaller than the case value y ) is higher than sim(x,y) (where the query
value x is higher than the case value y ).
Consider the following example:
CASE 1: Let x = 10.000 be the query value and let y = 20.000 be the case value.
CASE 2: Let y = 20.000 be the query value and let x = 10.000 be the case value.
We would expect sim(x,y) to be higher in CASE1 than in CASE2 meaning that a car which
is cheaper than our specified query value has a higher similarity than a more expensive one.
The idea using the advanced similarity mode is to create a measure that is based on the distance of the query and the case value. You can add similarity points and the result will be an interpolated function for your similarity measure. Each point consists of a distance and a similarity value. The distance is plotted against the x-axis and the similarity value is plotted against the y-axis. There are three basic points which are necessary for a correct SMF:
- min: the minimal distance (according to the slot's range)
- 0: meaning case value = query value (exact match)
- max: the maximal distance (according to the slot's range)
The distance is calculated by
distance := query value - case valuewhere the both values are possible values that may occur and fit the slot's range. Usually, the similarity of distance 0 is 1.0 just as in our example. Considering the example given above, the minimal distance is set to 0.0 and maximal distance is set to 0.8.
You are able to add further similarity points (optional), however, the basic similarity points are sufficient for our SMF. The SMF will be a linear interpolation over all similarity points (basic and optional).
Our example uses the advanced similarity mode for the slots
CCM, Miles, Doors, Year, Power and Speed, too.
Now we want to edit the SMF of our slot Body which is of type
symbol. Therefore, we want to use table as similarity mode.
5.1.2 Table Editor
The table editor is used to describe the similarity mode table. This similarity mode
can be chosen for the slot type symbol.
If there are only a few values for your
slot which can't be ordered absolutely or hierarchically, you should use the table editor.
In the given example, the table editor is used to
define the local similarity of Body.
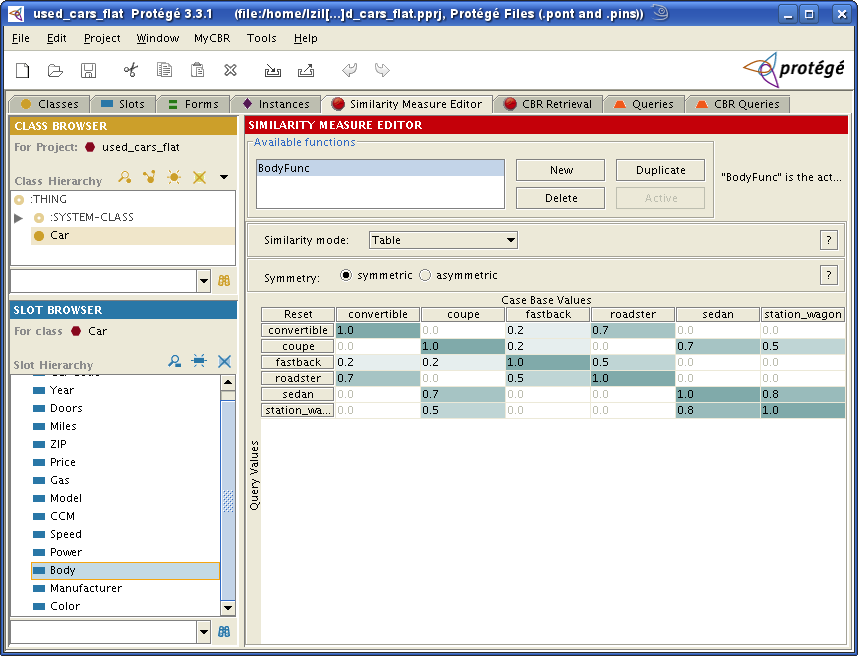
There is an initial table whose diagonal the value 1.0. Every other cell has the value 0.0. This is because of the reflexive relationship of a similarity measure. It is obvious that each slot is similar to itself with similarity 1.0.
First we specify the symmetry mode.
Choose symmetric so that every similarity between a case and a query
value will be equal to the similarity between this case and this query value.
To complete the initial table you can directly edit the similarity values
between a case and a query value by double clicking on a cell.
If you edit the similarity of query value x
and case value y to sim(x,y) = 0.5 then sim(y,x) will automatically be
set to 0.5 (whereas in asymmetric mode, those two similarities can have
different values)
As we define the similarity of a query and a case value as a value in
range [0,1], you cannot enter a value that is not included in this range.
The similarity described by the given table is highlighted by a blue background color of the cells. Darker blue means higher similarity. White means a similarity of 0.0.
By clicking on the first cell in a column, the rows are sorted by this column. If you click on the first cell in a row, the columns will be sorted by this row. The sorting is reseted by clicking on 'reset' in the upper left cell of the table.
Our example uses table as similarity mode for the slots
Gas and Manufacturer, too.
Now we want to edit the SMF of our slot Color which is of type
symbol. Therefore, we want to use the Taxonomy Editor.
5.1.3 Taxonomy Editor
The taxonomy editor is used to describe the similarity mode taxonomy. This similarity mode
can be chosen for the slot type symbol.
First of all we want to point out, that a taxonomy is very powerful and that
one cannot give some kind of "universal"
explanation of how to represent similarity measures with it.
The way of how to compute the similarity measure differs depending on the scenario
your taxonomy is based on.
Here, we only want to give a short introduction and want to discuss possible interpretations.
If you are interested
in more details and other examples, there is a
paper on the use of taxonomies
by Ralph Bergmann, which describes how to compute the similarity in the possible situations.
You could use taxonomy as similarity mode if the slot's values can be arranged
in a hierarchical structure, such that:
- the nodes on same levels are disjoint sets
- nodes on the last level are real-world objects
- inner nodes consist of the real-world objects that follow in the hierarchical order
In our example the similarity mode of the slot Color is taxonomy.
The resultant structure specifies parent-child relations through the position
of the objects in the taxonomy.
This means, that a node has at least the same attributes its parent node has.
For instance, "dark_red" is also "red".
The real-world objects are e.g "dark_red" and "orange".
So "red" is an abbreviation for all cars colored "dark_red" or "orange".
You can distinguish between inner nodes, leaf nodes (real-world objects) and a root. "red" and "green" are inner nodes, "dark_green" and "dark_red" are leaves and "color" is the root.
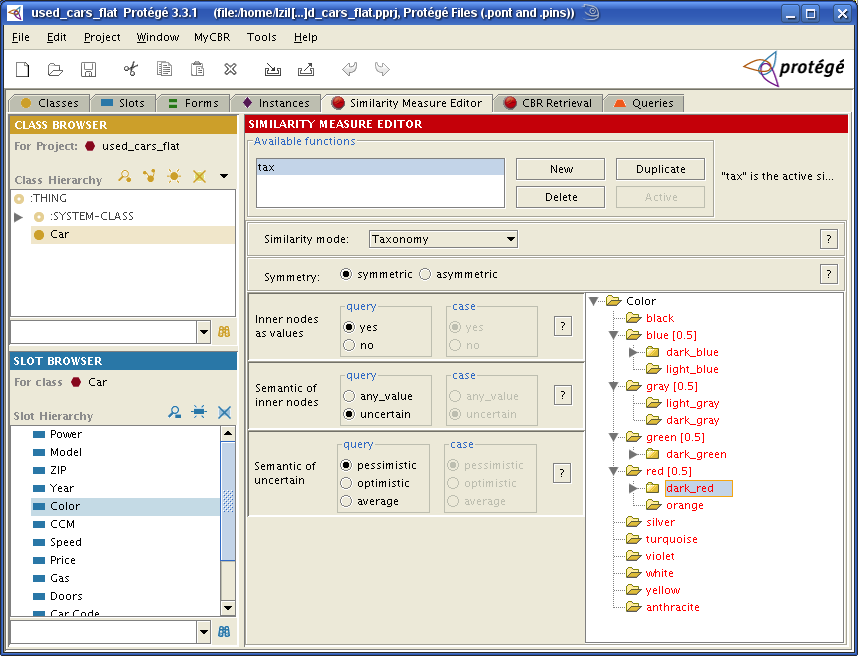
First, we have to specify the symmetry mode.
Choose symmetric so that every similarity between a case and a query
value is equal to the similarity between this case and query value.
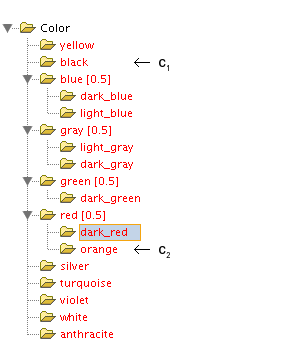
The similarity can be assessed by the parent-child relation of the query and case value in the taxonomy.
Let c1=black and c2=orange be case values
and imagine a query value
q=dark_red. Then c2 is closer to q,
such that the similarity should be higher than the similarity of
c1 and q (cf. Fig.7).
The deeper symbols are located in the taxonomy, the more they have in common.
For example, "dark_red", "orange" and "black" are all colors, however,
the two first-mentioned are also "red".
This is why the default similarity of inner nodes becomes higher the deeper your object is
located in the taxonomy. It can be interpreted as:
the leaf nodes, an inner node consists of, have at least the given similarity.
This is why the similarity of the root and the leaf nodes
is implicitly defined: You expect, that the leaf nodes have at least the similarity 0.0
(value defined for root)
and since leaf nodes are the deepest nodes in the taxonomy the similarity is 1.0
(a leaf node is equal to itself).
You can change the default similarity by a double click on the inner node.
Furthermore, you can easily edit the hierarchical structure by drag-and-drop.
Try it and you will see, that the default similarity values will be adapted.
The semantics of inner nodes specifies whether inner nodes are allowed as query/case values or not. Allowing only leaf nodes as query and case values means that only the similarity of leaf nodes have to be computed. We allow inner nodes as values and now have to define the semantic of this.
There are two possibilities if the query value is "red": It could be interpreted as
"the user is looking for a car which is dark_red or orange"
(meaning all leaf values, the query value consists of do lead to a similarity of 1.0).
any_value is associated with this interpretation.
The other possible interpretation is that the user is actually looking for exactly
one of "dark_red" or "orange" colored cars,
but is uncertain which of those values is the correct one.
Semantics of uncertain: we can distinguish between three different possible methods to compute the similarity between two taxonomy symbols.
- pessimistic: uses a lower bound
- optimistic: uses an upper bound
- average: uses some kind of expected value
The taxonomy editor automatically creates the table used for the table editor. So you can use the taxonomy editor to initially fill the table and then switch the similarity mode to table for manually edit the table. This is very useful in case you want to use the table editor but your project structure is very complex.
Our example uses taxonomy as similarity mode for the slot
Model, too.
Now we finished editing our local SMFs and can continue by editing the
global SMF
5.2 Global Similarity Measure
Since our scenario does only have one class, we now want to edit its SMF. Switch to Car in the class browser in the upper left hand side corner. Then you will see the editor for the global SMF. At the beginning there is an initial SMF called "default". If you delete it you will get the info "no similarity measure defined" so that you can simply edit it. You see a table where each row specifies similarity measure options for a slot. For each attribute (slot) you can specify:
- whether it is discriminant or not, meaning whether
it should be included in the global similarity measure or not (e.g. the slots
ZIPandCar codeare not used). For this weight you can use an arbitrary range which is unbounded. - a weight, for specifying the importance of a single slot for the global
SMF (e.g. the slot
Pricehas a higher weight thanGas) - a local SMF, which can be either the current slot's active SMF or another one of the slot's SMF (we use the active SMF for each slot, since we do not have other SMFs)
- comment (optional)
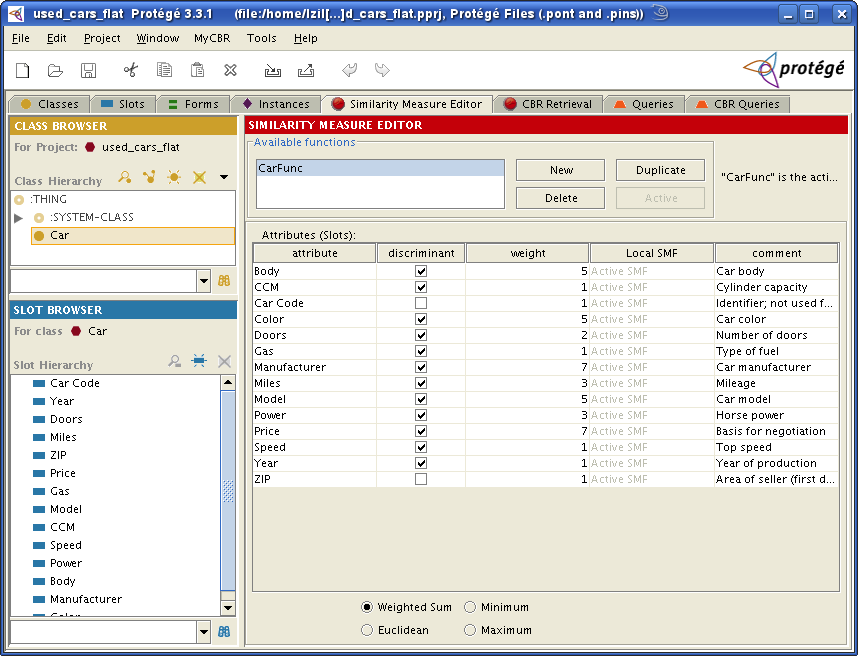
In case a slot has no SMF, it is marked with "no similarity measure available" (as comment) and you are not able to check descriminant.
You can specify several SMFs for one class, but only one can be used at a time.
This one must be marked as active using the "active" button.
In our example, this is the SMF CarFunc.
If the current SMF is already marked as the active SMF, the "active" button will be disabled.
The global SMF for the current class could be calculated using one of the following approaches:
- weighted sum
- euclidean
- minimum
- maximum
We use weighted sum, however, there is no rule which of the four possibilities
to use best.
This highly depends on your scenario and on the constraints your similarity measure has to fulfill.
We now finished editing our SMF and can start our retrieval by using the
myCBR's Retrieval Engine.
6. Retrieval Engine
After defining all necessary similarity measures we can start using the retrieval engine.
The first column lists the slots in our class Car. The second column specifies the query values
for each slot.
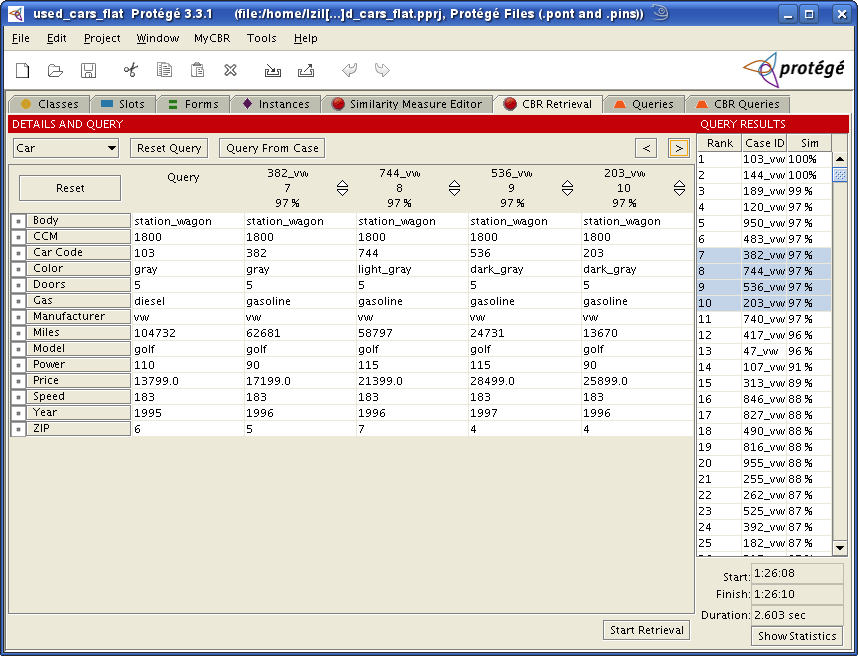
Query Generation
We can now either enter a query or perform a query based on a case.
The first opportunity is to manually enter query values for each slot. Be sure to enter values that are consistent to
the slots' constraints.
Query From Case
On the other hand, you can use Query From Case. There is a popup showing the available cases.
If you choose one the query values will be filled with the values of the chosen case. You can edit these values
or directly start the retrieval which will then give you the cases which are similar to the case you have chosen.
Start Retrieval
You can enter query values for each slot. Click Start Retrieval in the lower right hand side corner.
The table then shows the cases which are most similar to your query values according to our above defined
similarity measures.
Now there is an additional list on the right hand side showing the cases which are ranked using the similarity they have to your query values. Furthermore, you get statistics for you retrieval.
The table on the left hand side now shows the first cases in the ranked list.
Again there is a colored background. Darker color means higher similarity and white means similarity of 0.0.
By clicking on the first cell in a column, the rows are sorted by this column.
If you click on the first cell in a row, the columns will be sorted by this row.
The sorting is reseted by clicking Reset in the upper left cell of the table.
Now you should be able to customize the example Used Cars (flat) or adapt it to your own projects.
Moreover, the similarity measures introduced here can easily be
extended to similarity measures for more complex structures (e.g. inheritance).
 | Logo Design
by Stefan Schulz
| Logo Design
by Stefan Schulz valid XHTML 1.1 and CSS 2.1